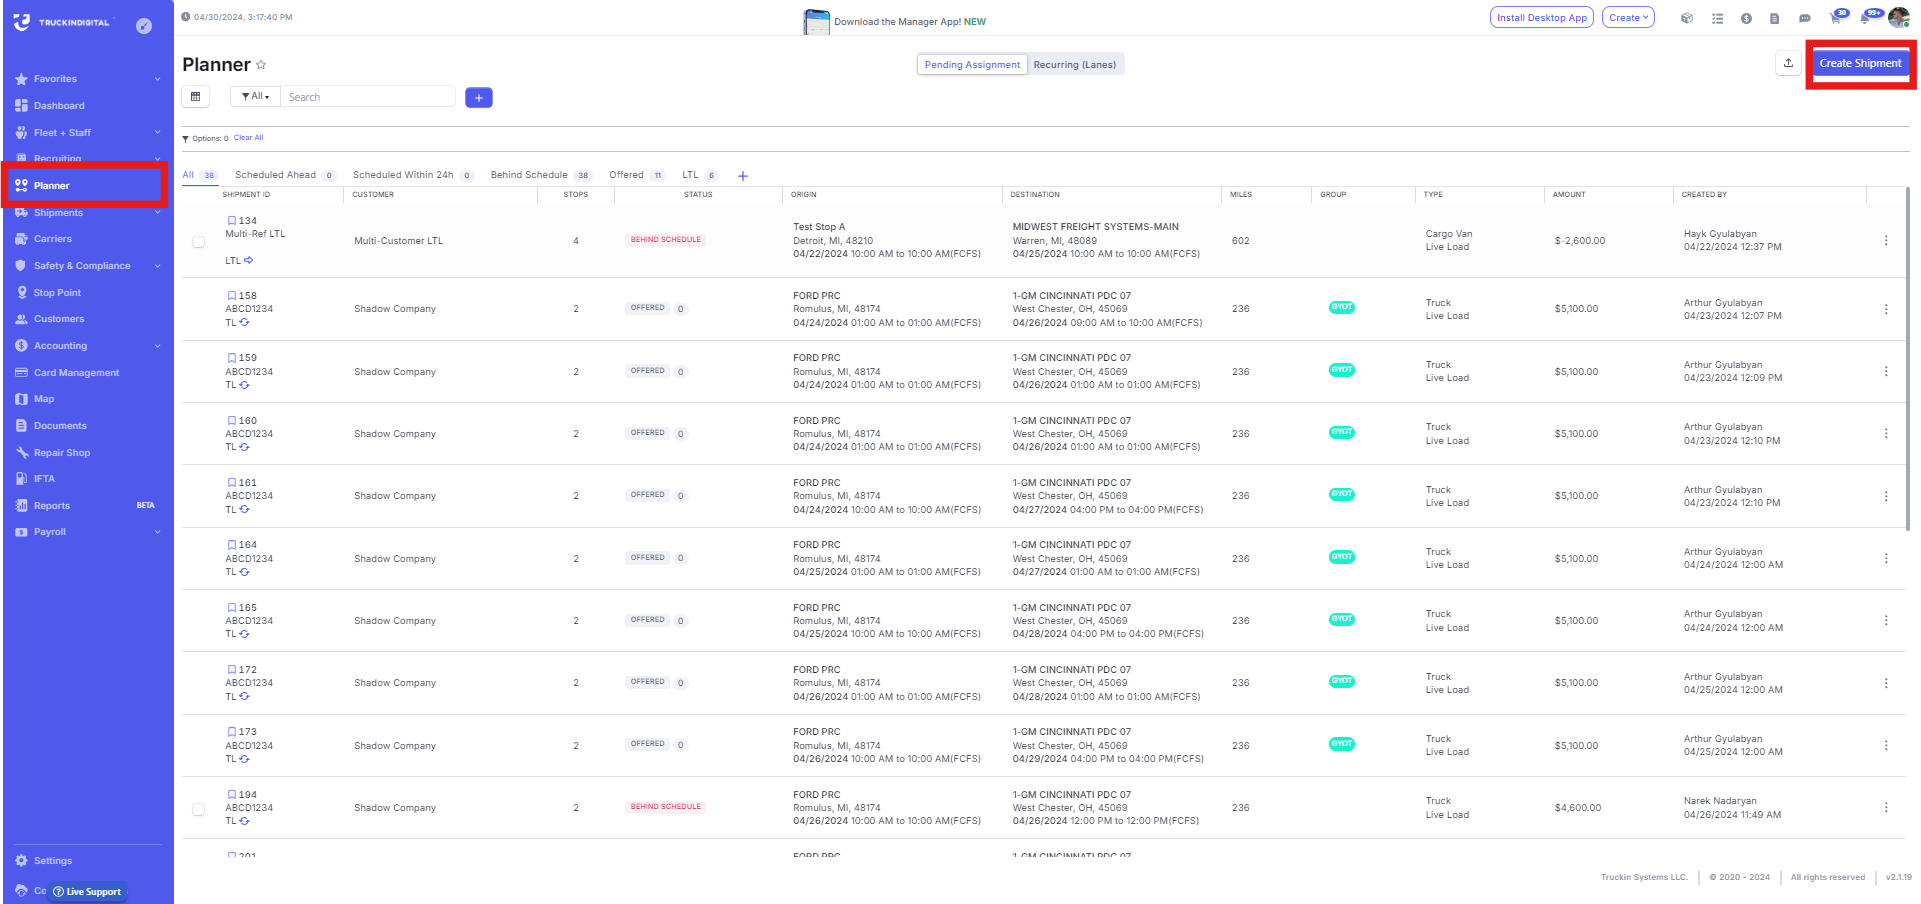
1. To create a shipment from Planner page all you need to do is click on the Create Shipment button.
2. You'll prompted into popup screen where you will be able to select the type of shipment LTL, if that shipment is a one time shipment or a recurring lane, and you can enter shipment details by your own or copy from previous shipment.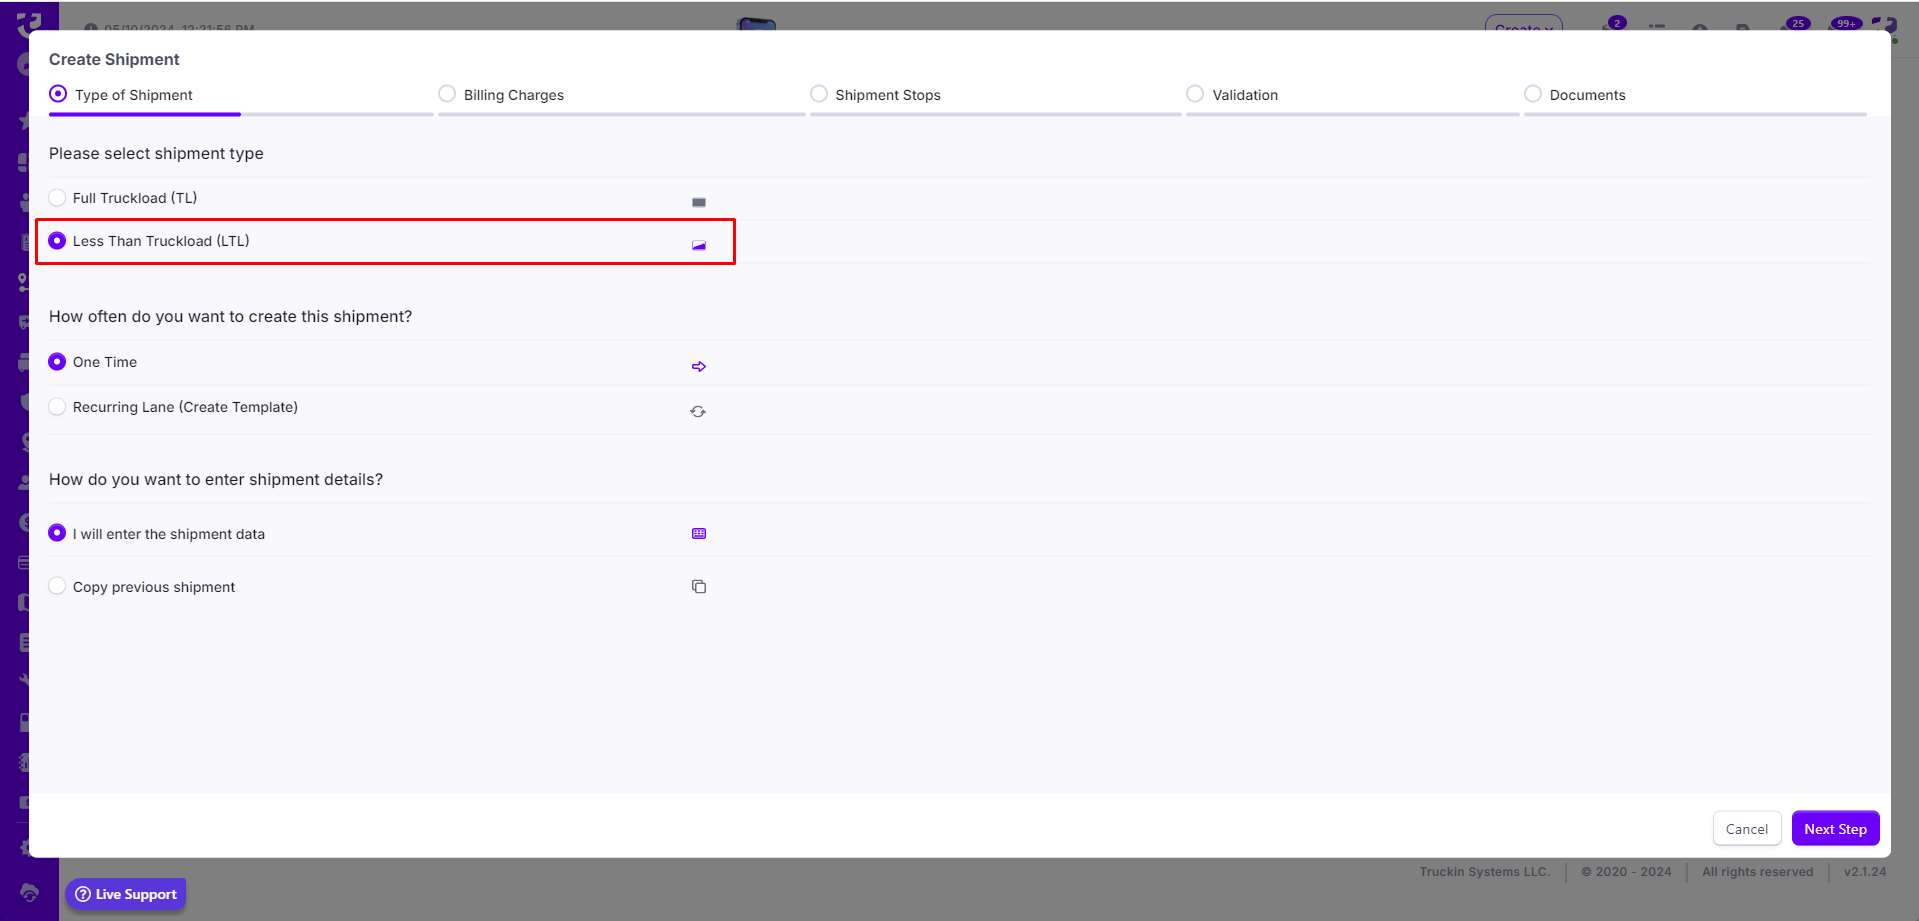
3. After you have selected the preferred options click on the Next Step
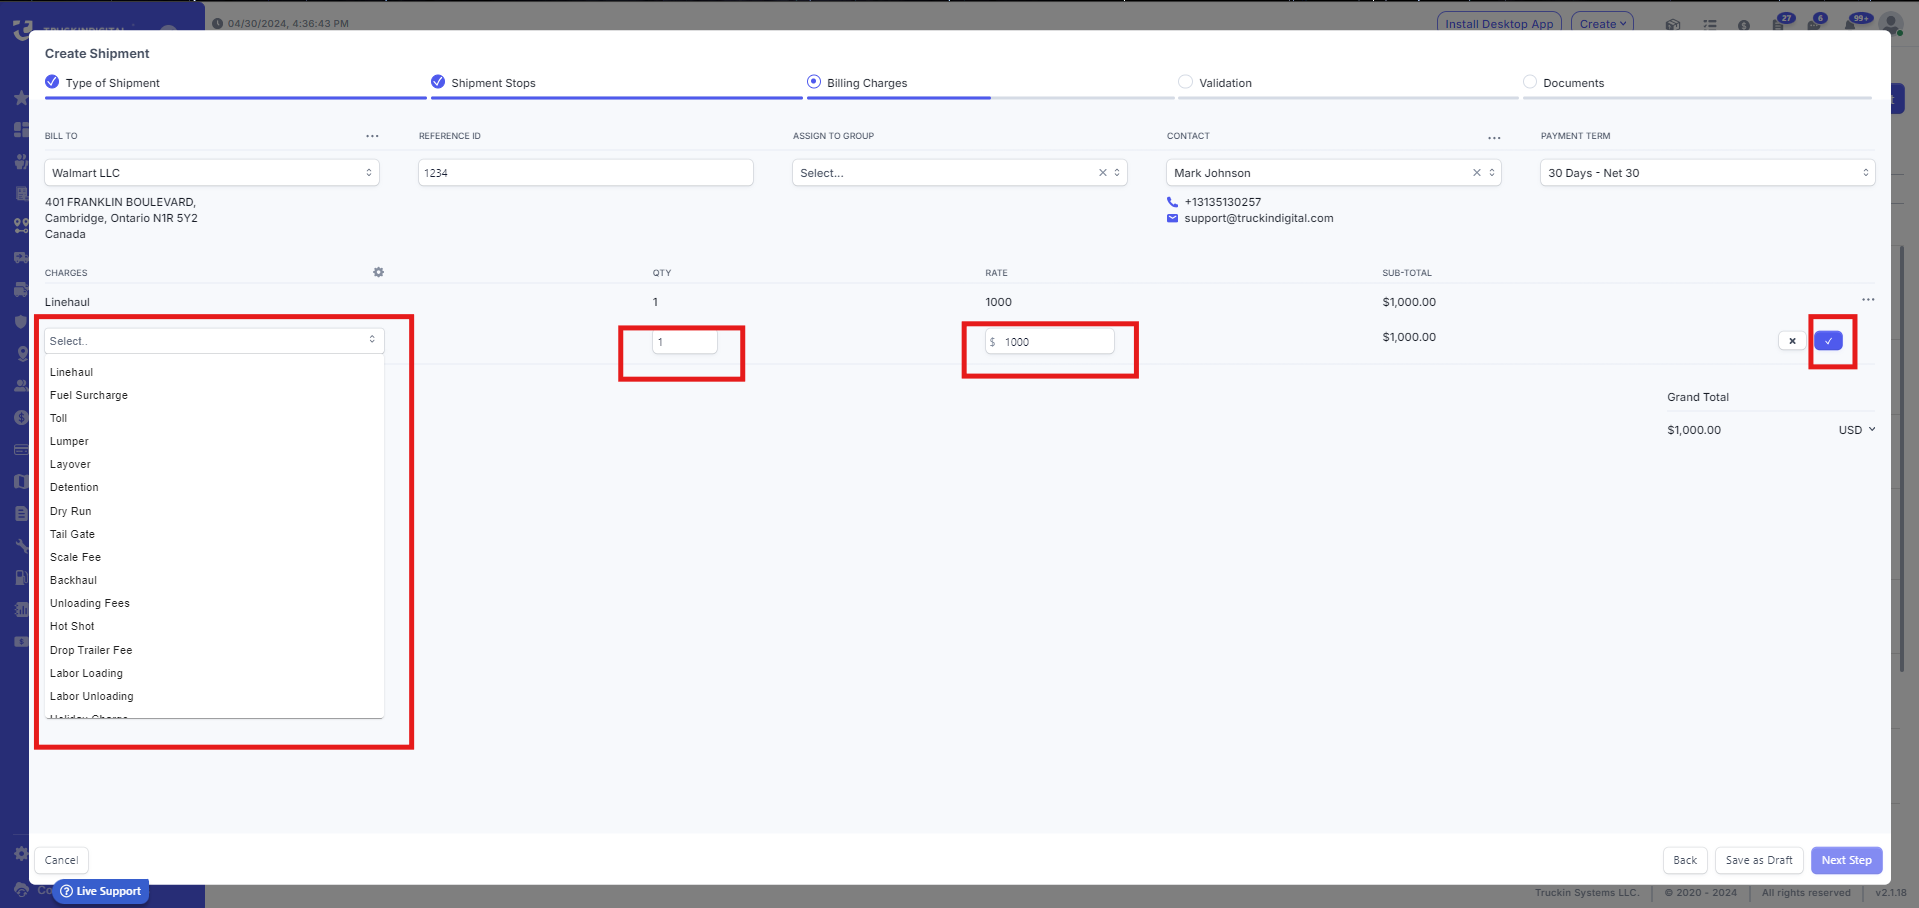
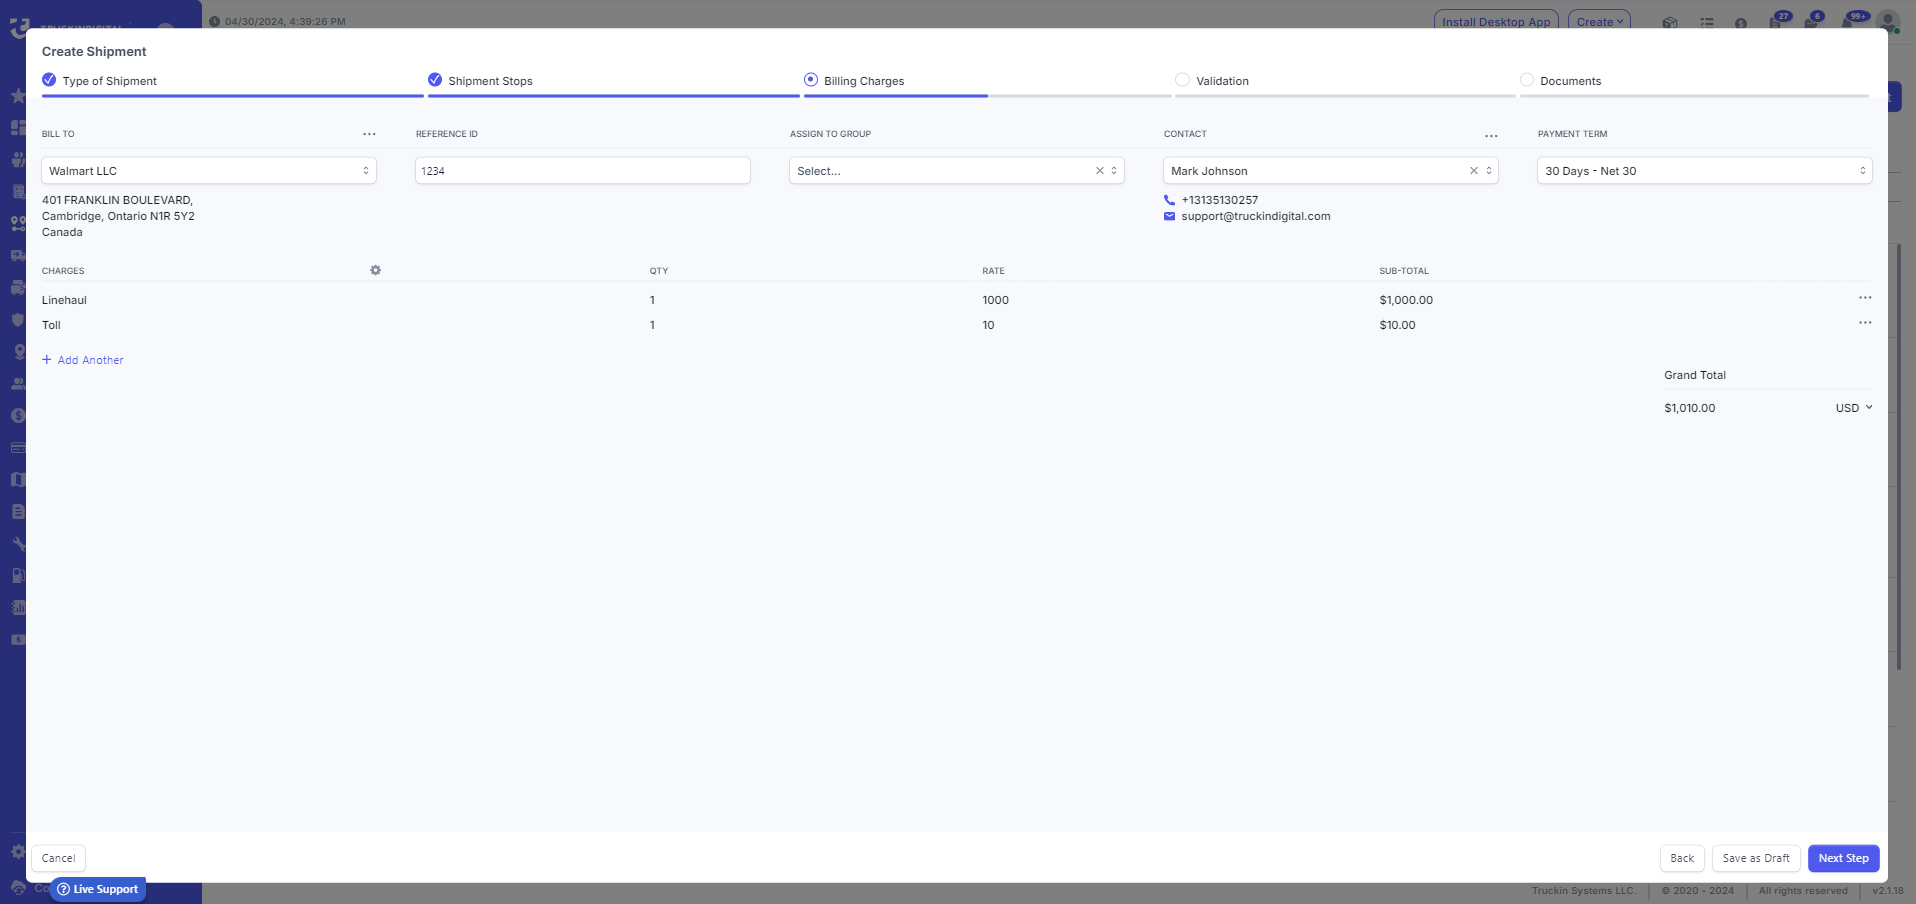
On the Next Step for the Billing Charges you'll be able to select the customers you want to Bill to, set the Reference ID, Assign them to a group which is optional, the Contact will be automatically added based on the customer's phone book and you can set the payment term.
For the charges part, you can add multiple charges by clicking on the Add Another and select charges from the list. Set the quantity and rate which will be added. It will be added to grand total. And select the blue checkmark box.

EXAMPLE

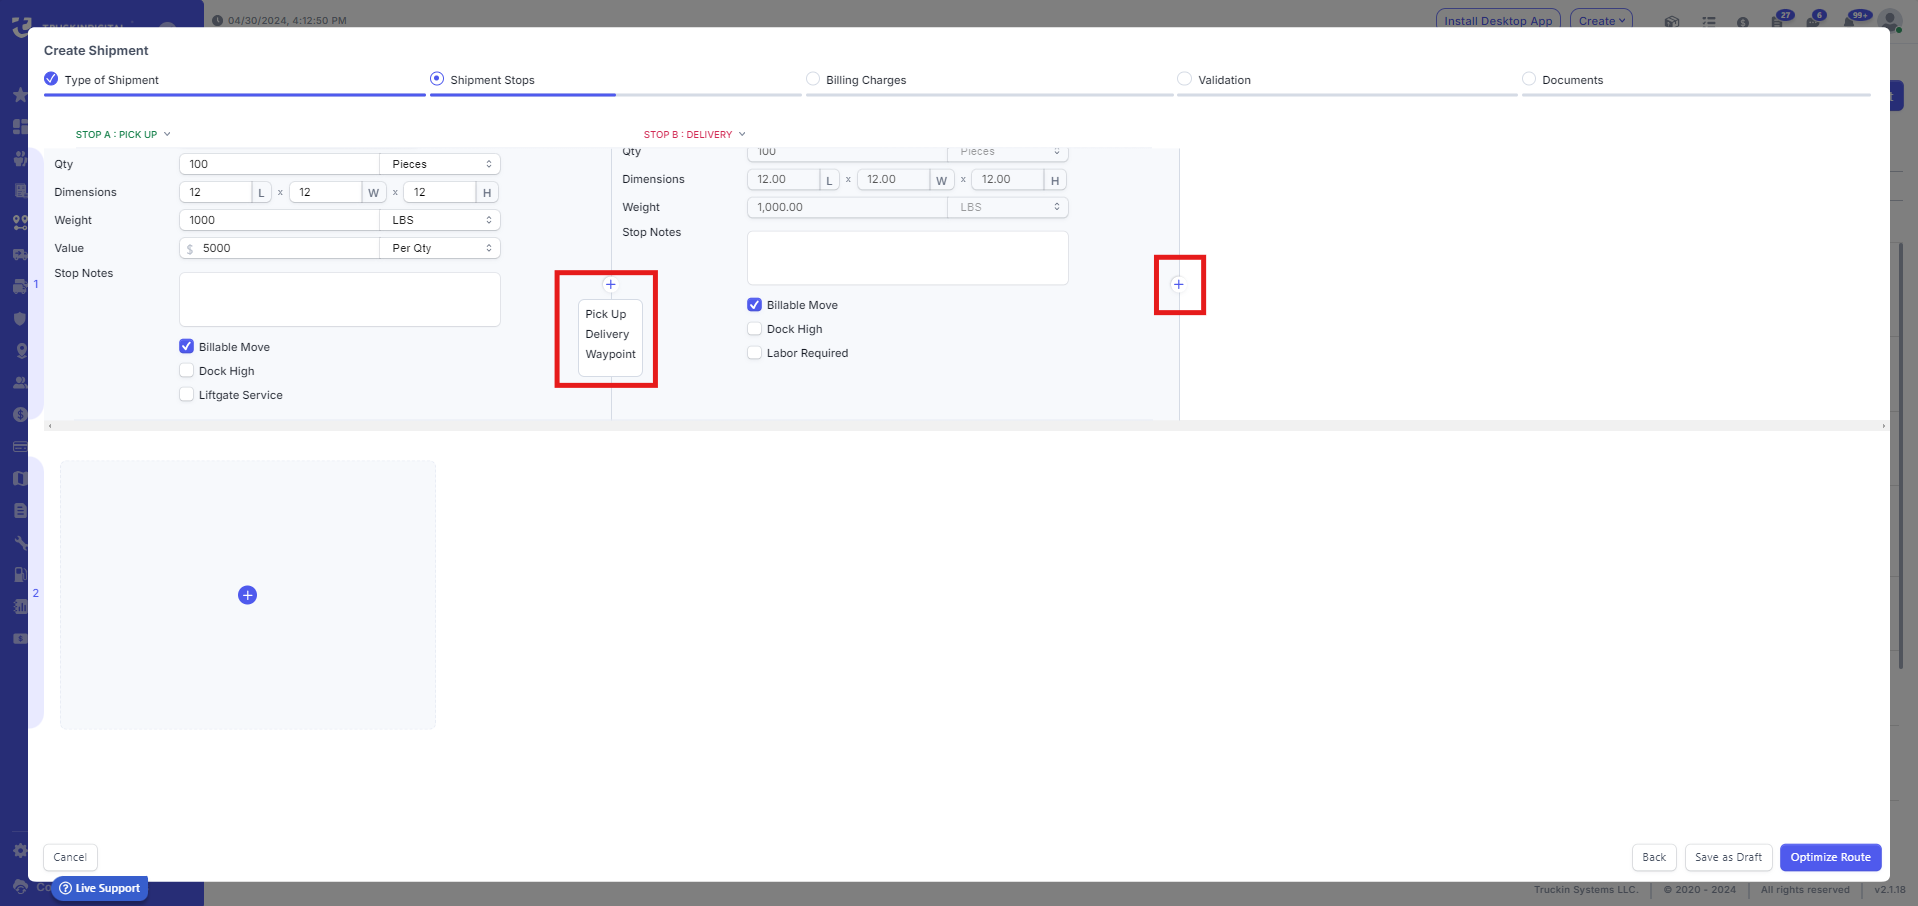
4. Select the Stop Points for each leg Additionally, you can add as many stops as desired by clicking on these plus icons.
5. Scheduled Date type and Date & Time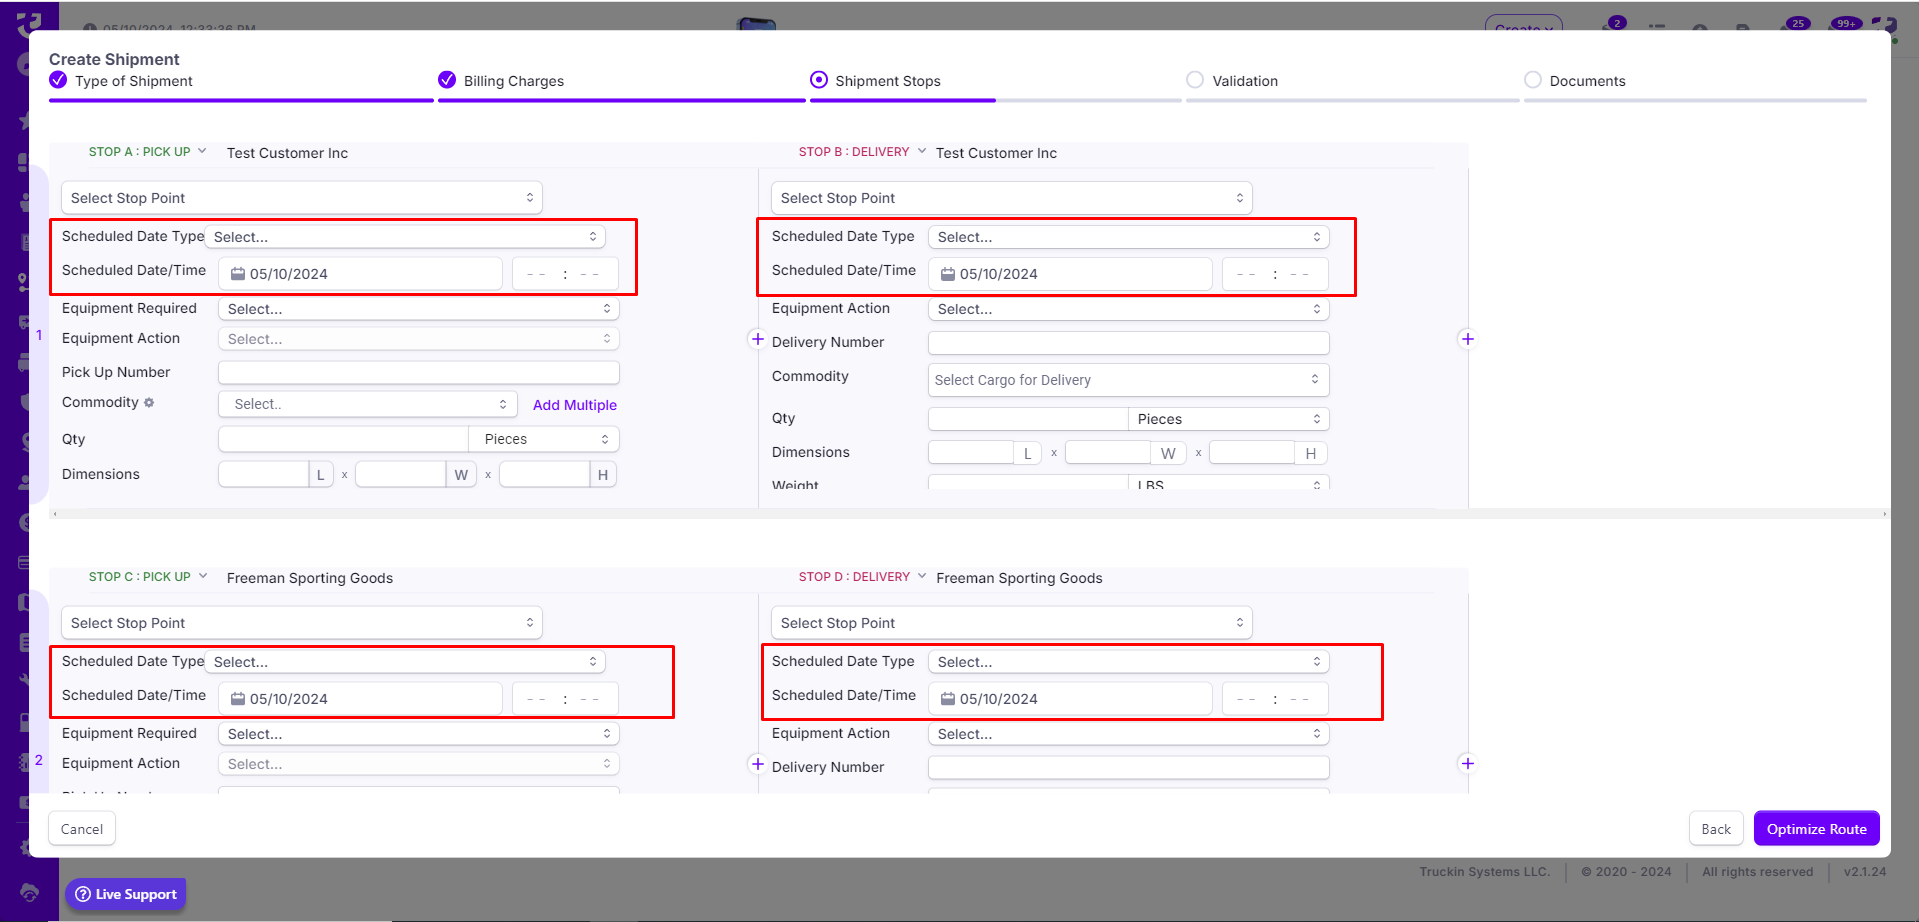
6. Required Equipment for this shipment
7. Select the Equipment Action
8. In case the equipment action is to Hook Trailer or Drop & Hook trailer, you'll be able to select your trailer from equipment list.
 In case the trailer is from 3rd party, you'll be prompted to add the ID, Type of Trailer and Length.

If it is a TBD (To be Determinate) option, you'll be able to add information about that trailer after you've received the information about it or Driver can update this information via driver app on that particular stop.
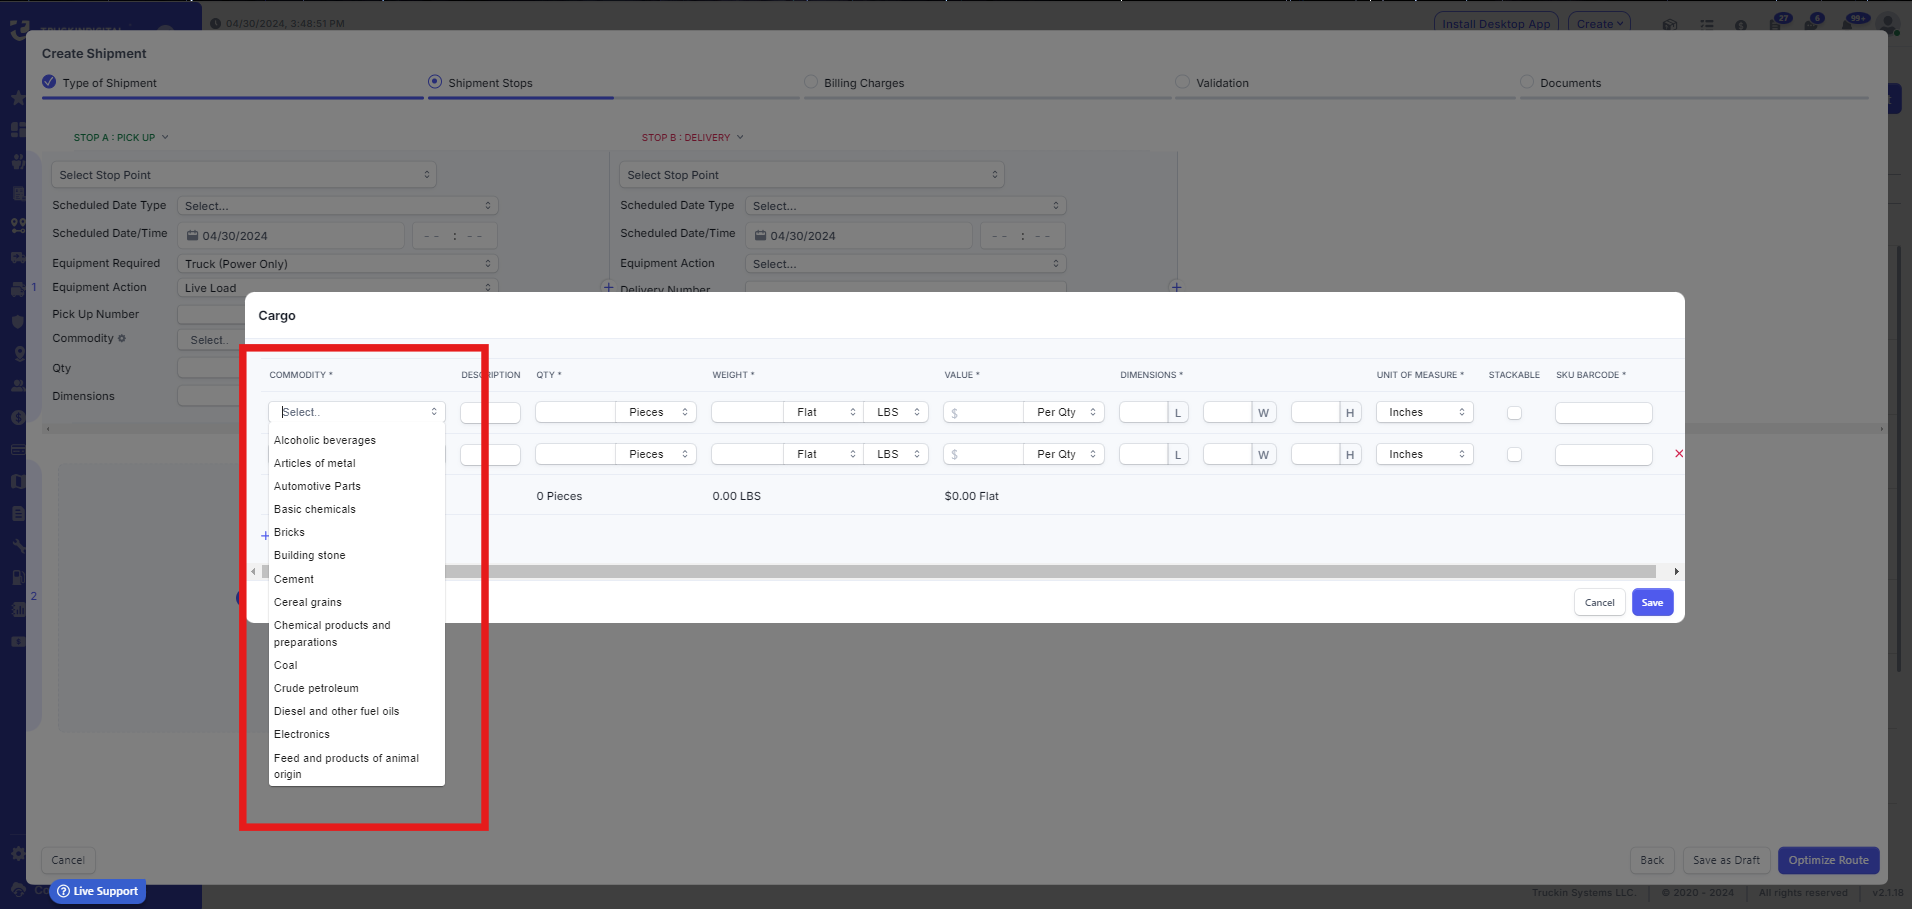
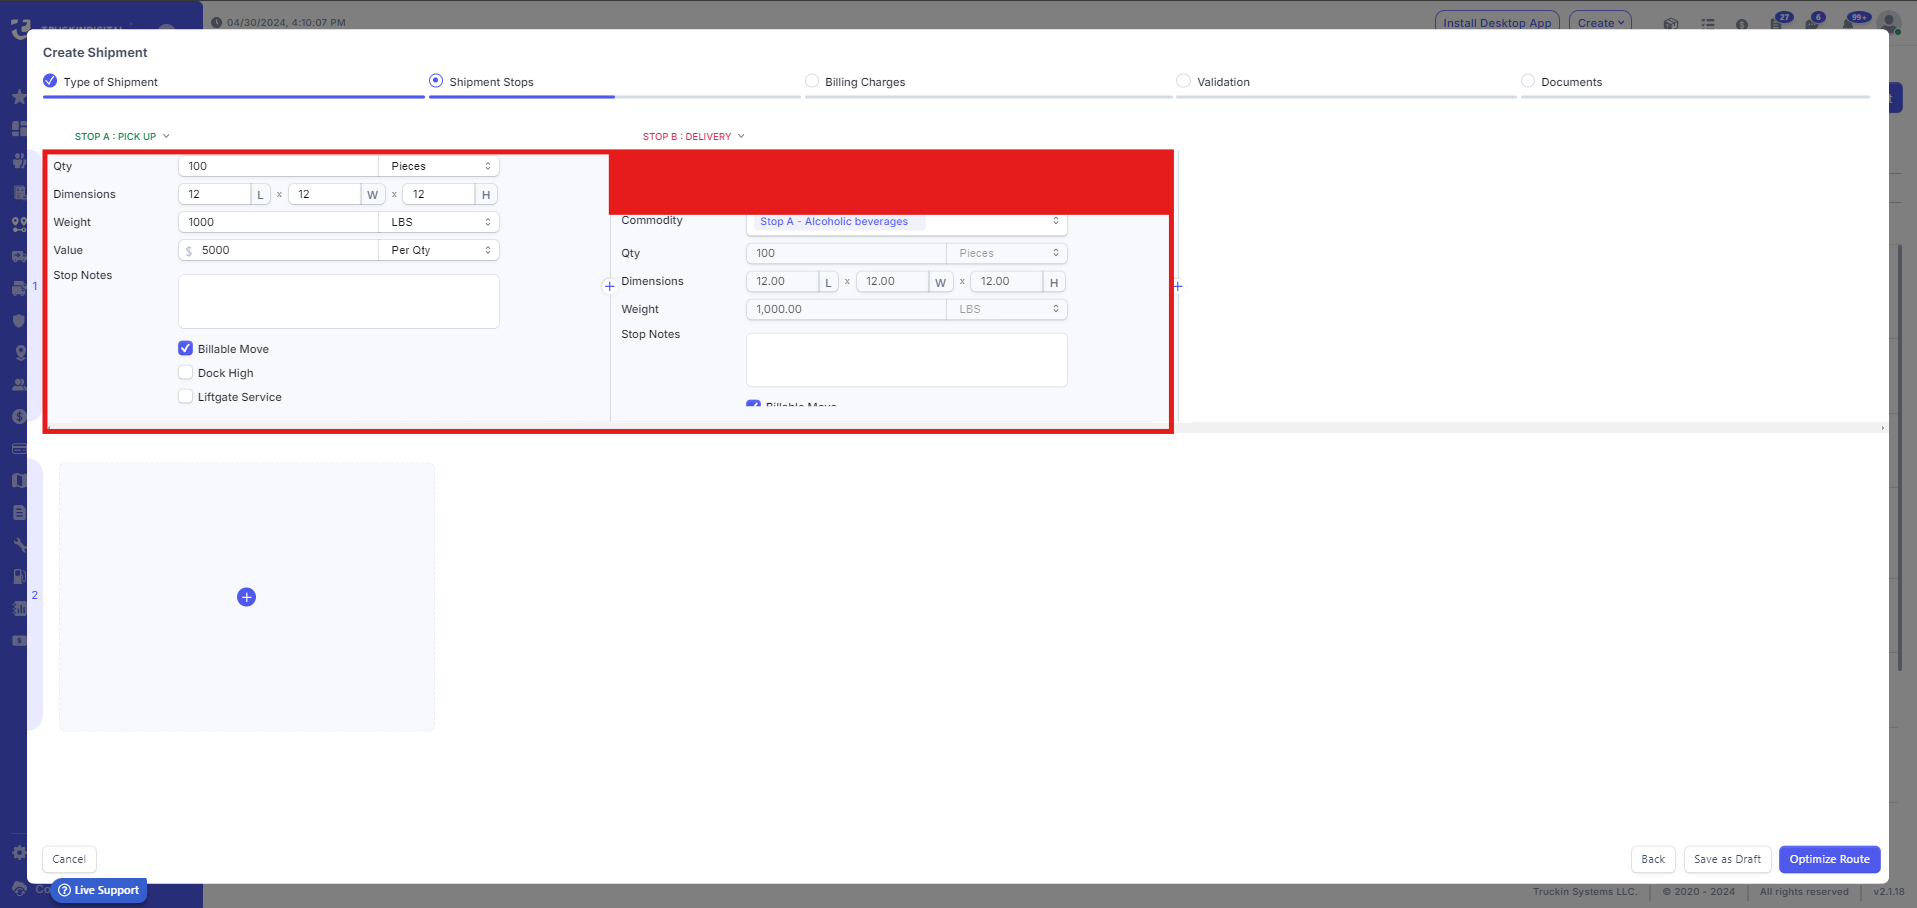
9. On the Commodity section, you can select singular commodity from the list or add multiple.
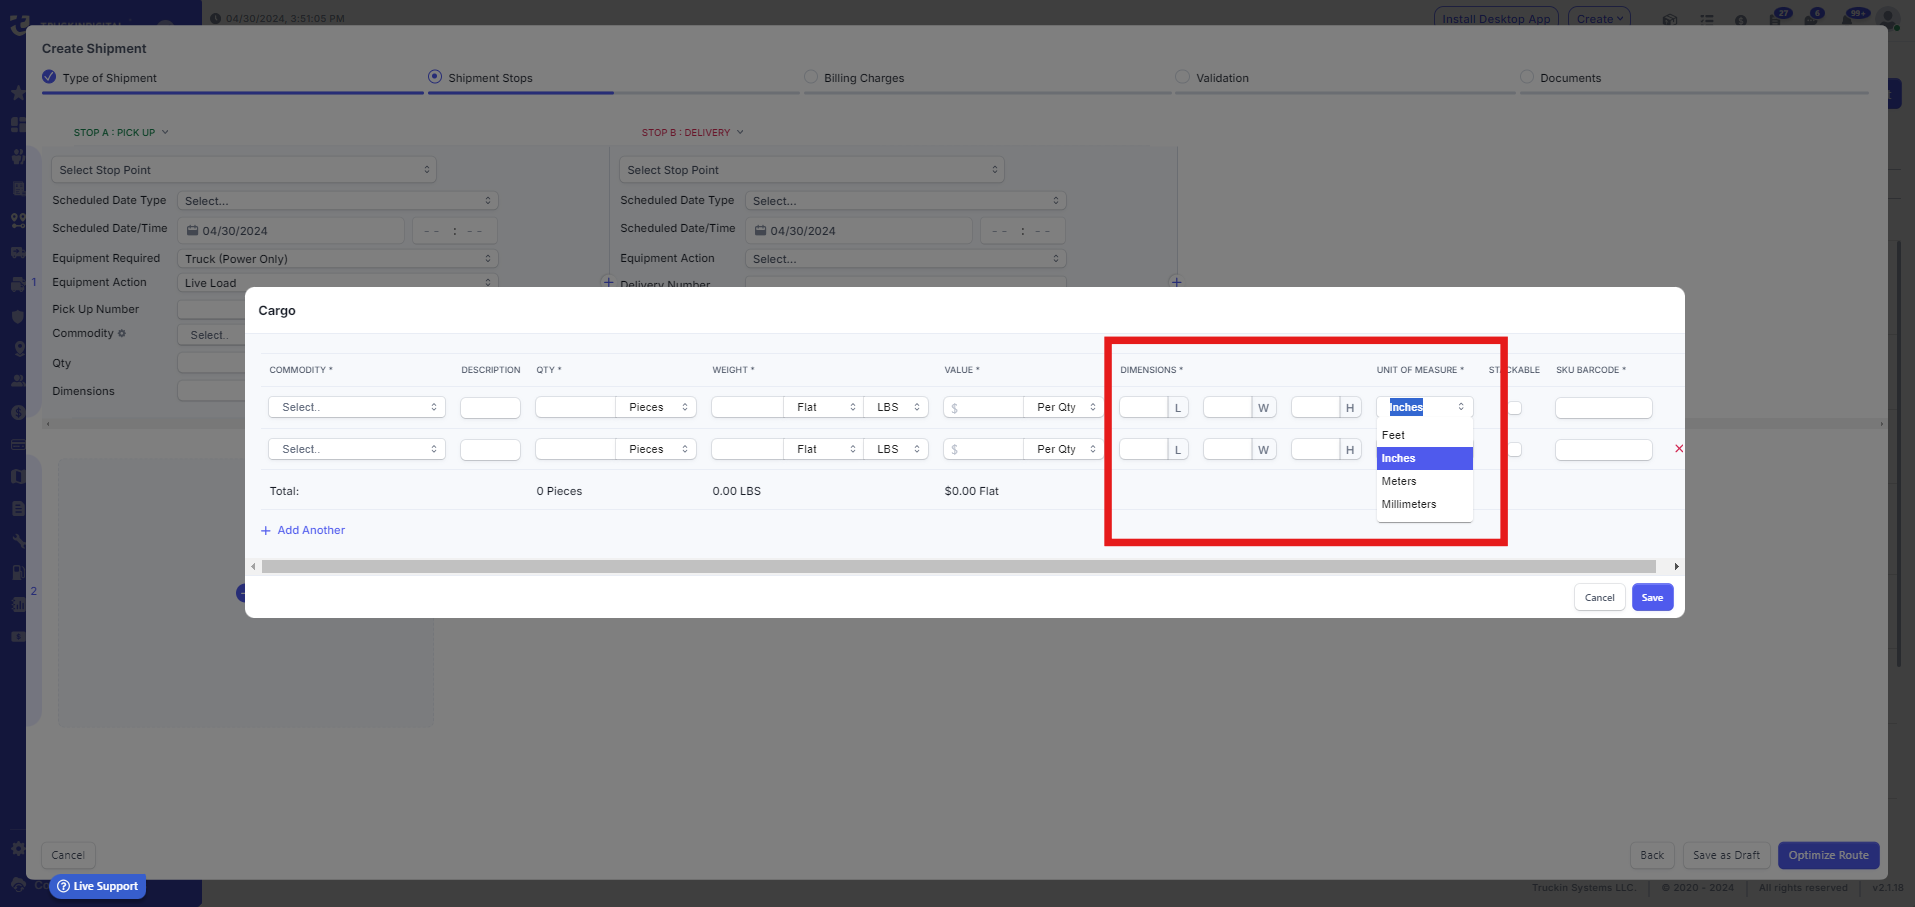
When adding multiple commodity types the system will allow you to add as many as you want by clicking the 'Add Another', in which you'll add the type of commodity, description, quantity (you can select by pieces, units, qty and pallets) the value that can be determinate to be per qty or flat, dimensions in particular Unit of Measure such as Inches, Feet, Millimeters or Meters, you can select if the commodity is stackable and add a SKU Barcode. 

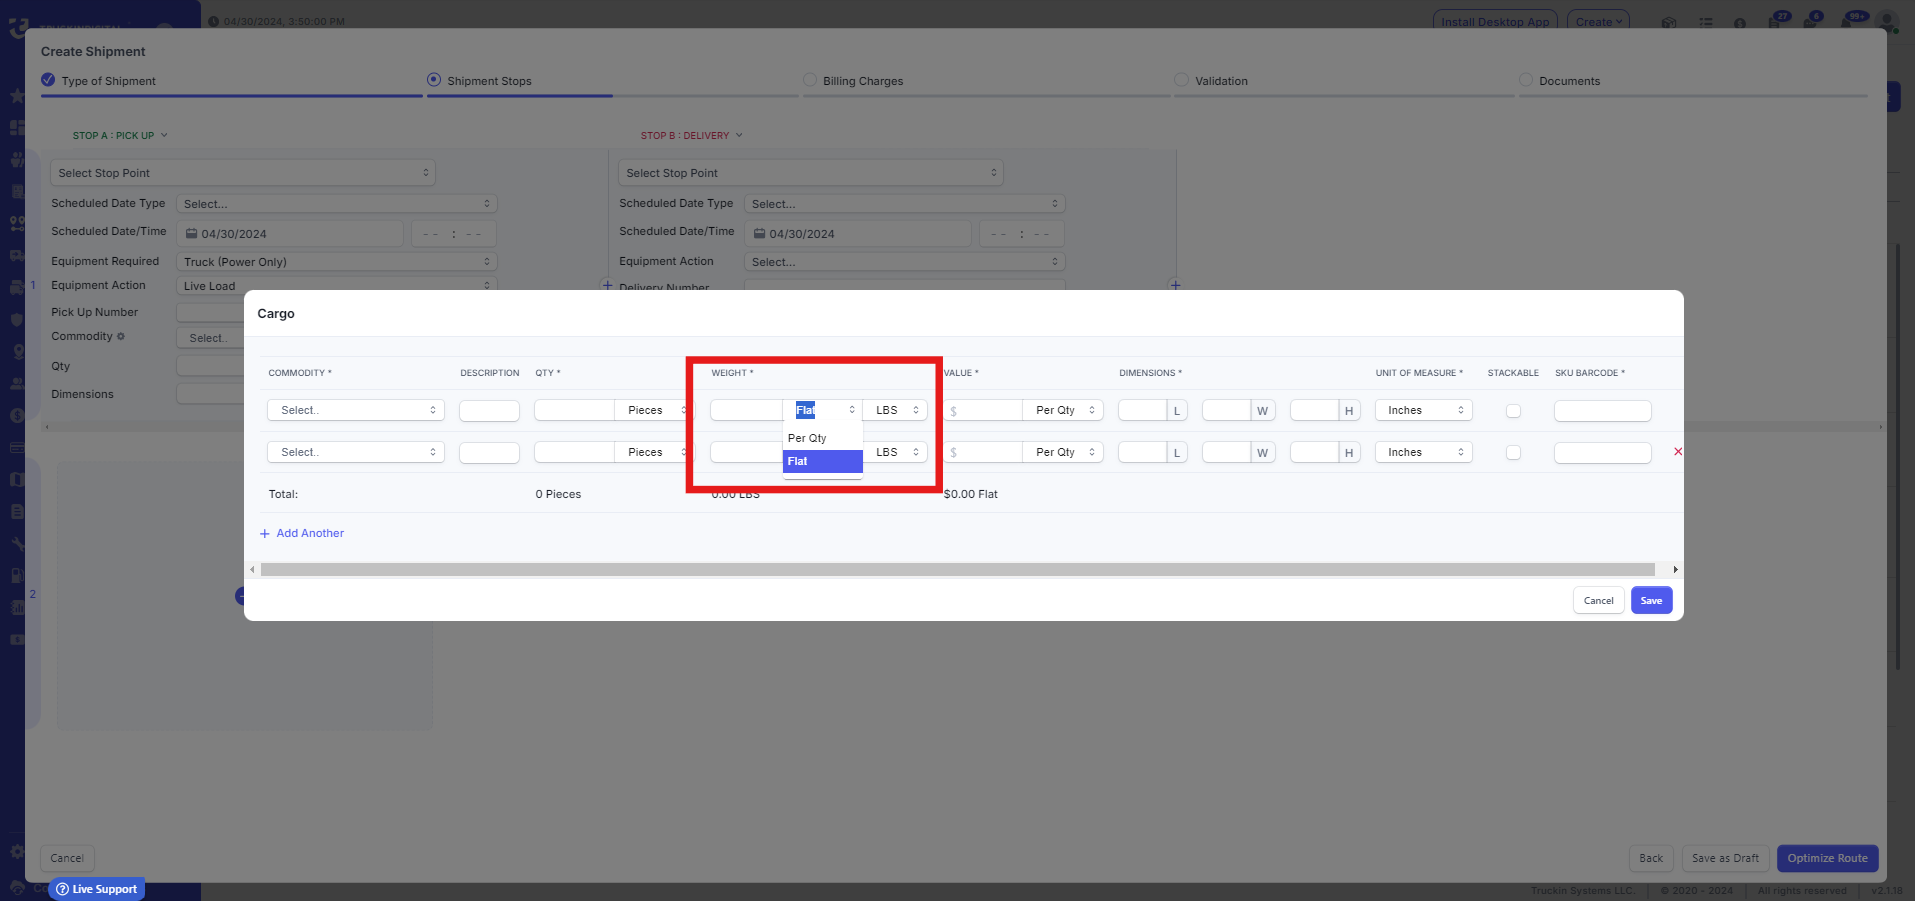


10. When selecting a single commodity, you must enter details such as Quantity, Dimensions, Weight, and Value.
Additionally, you can include Stop Notes that will be visible to the driver in the driver app for each stop.
And you have additional options for the each stop point.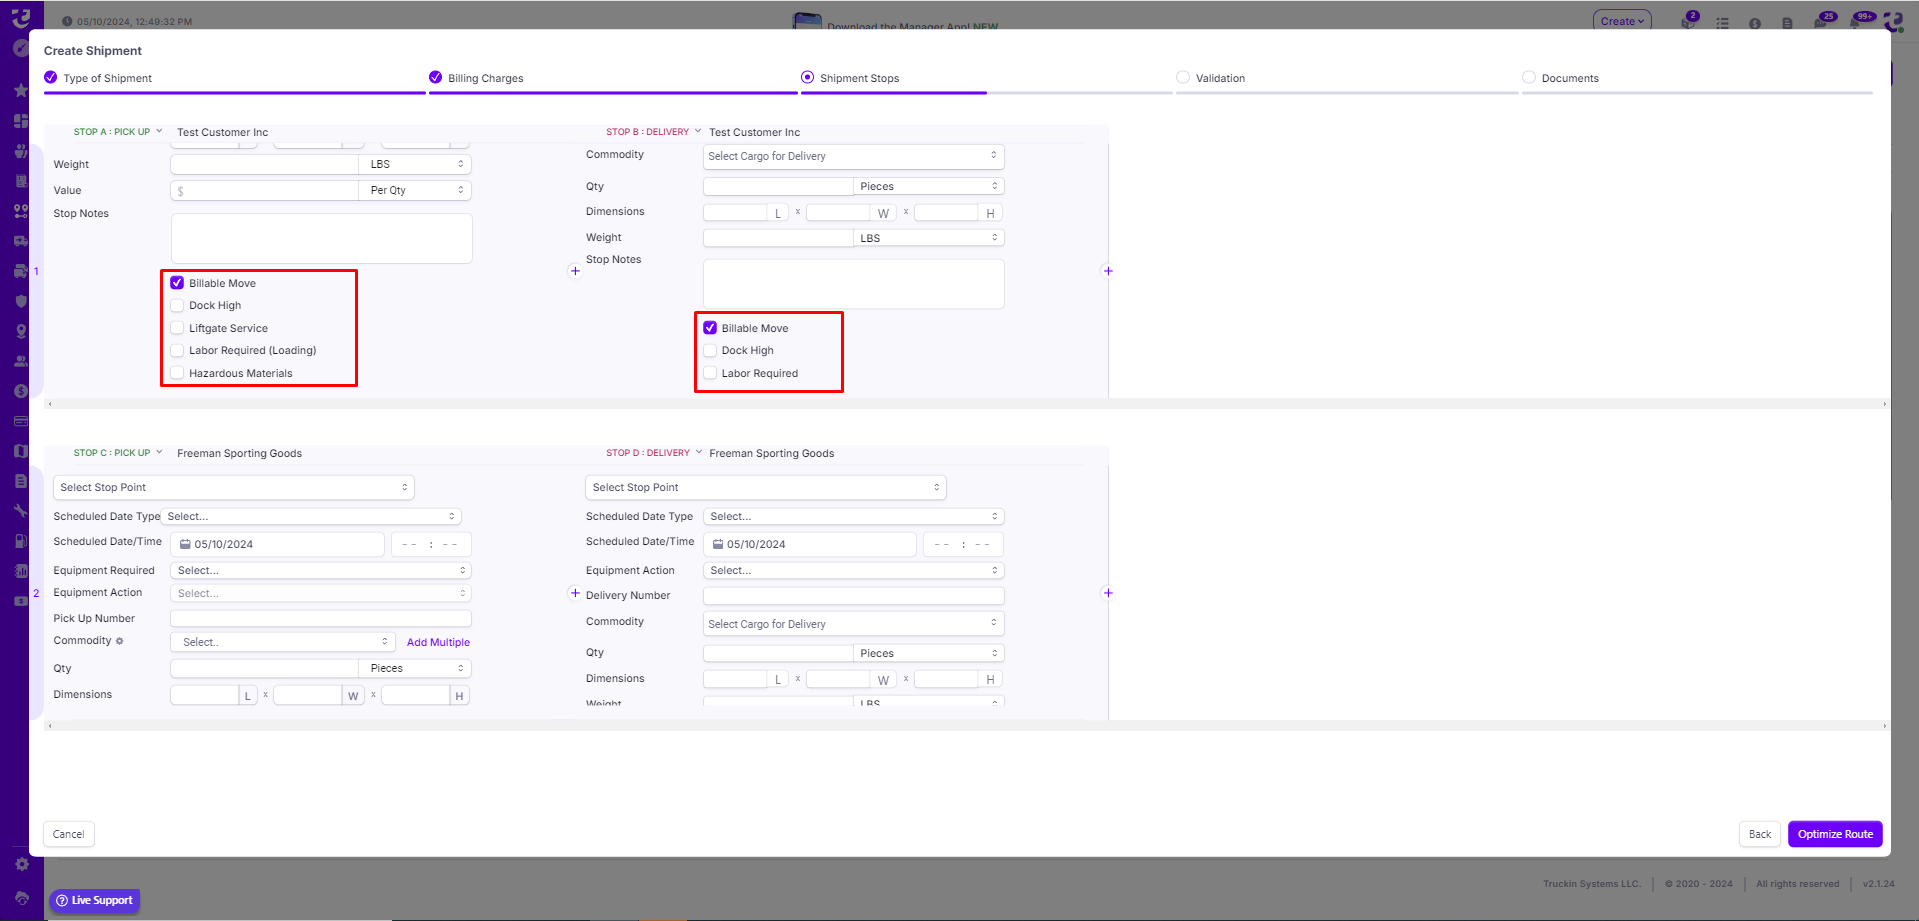
11. On the Delivery point choose a stop point or create a new stop point same as for the pickup point

12. Select the Scheduled Delivery Date Type same as for the pickup point
13. Set the Scheduled Date and Time
14. Select the desired equipment action, in this case for the delivery we have options as Live Unload and Drop Trailer.
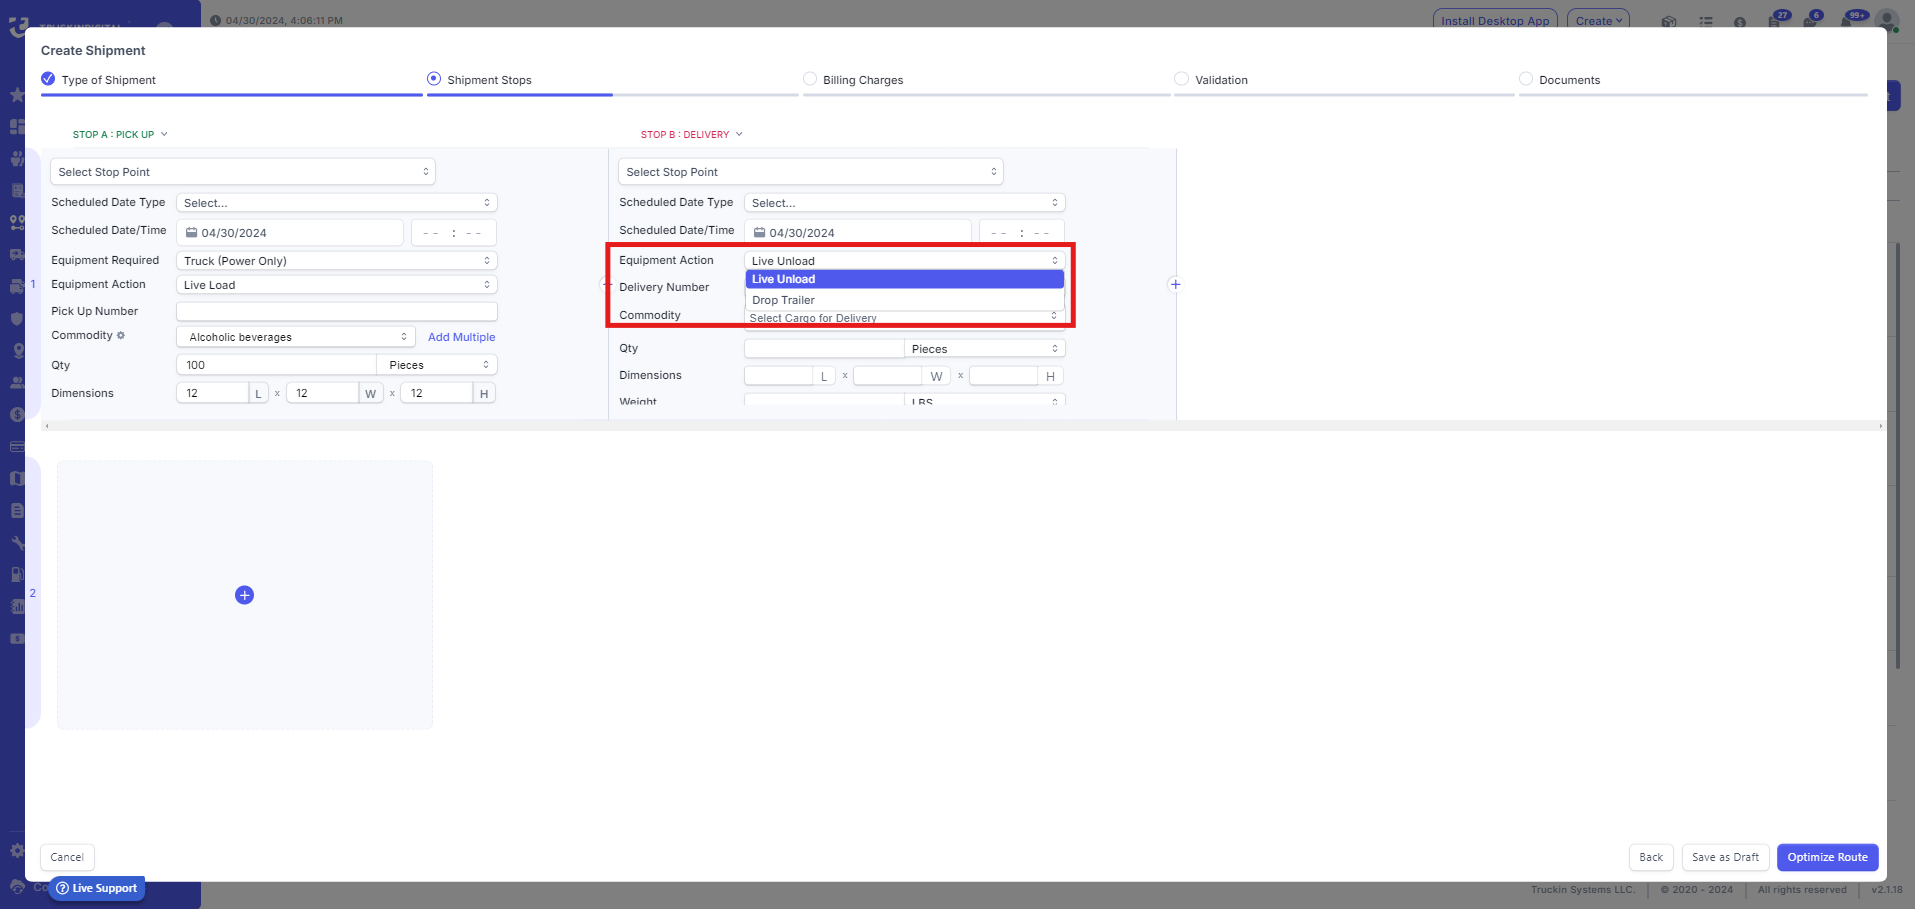
15. Set Delivery Number and choose commodity which will fill out all required fields based on the pickup point.
You can also add multiple Pickup, Delivery and Waypoints by clicking the plus sign.
16. Once you've filled the details you can go on and optimize the route.
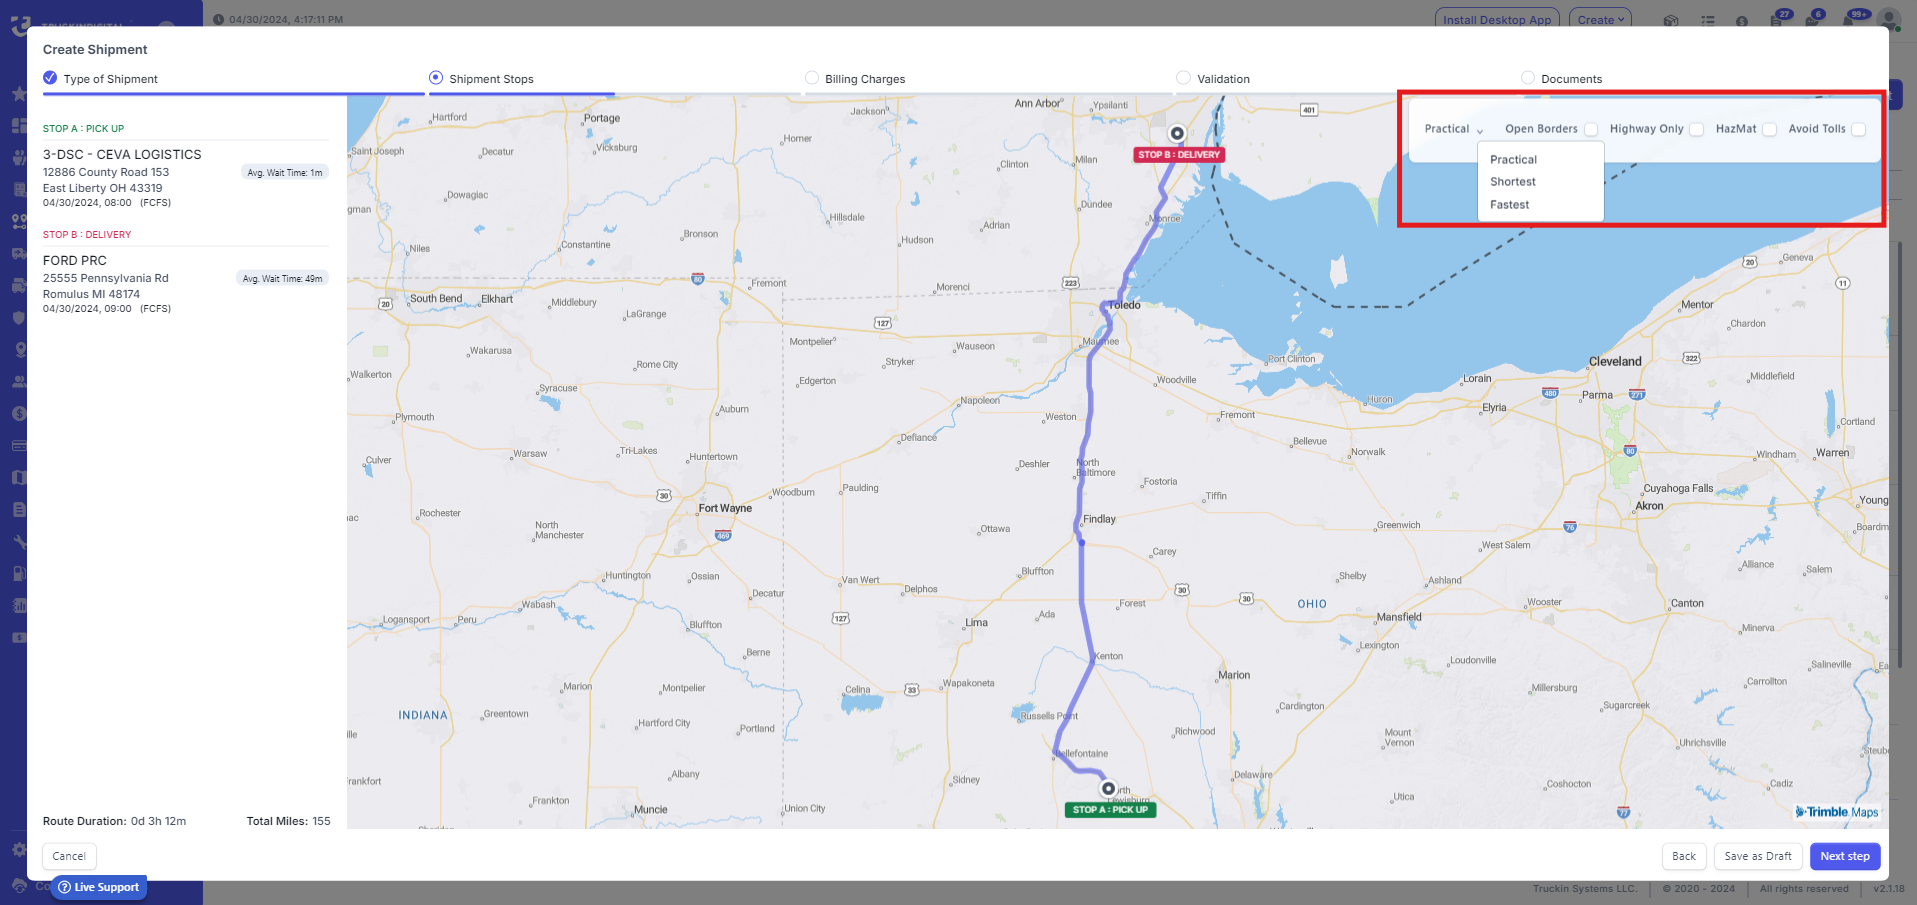
On the map optimization, you'll be able to select different map options, such as the map type, open borders, highway only, hazmat or avoid tolls, and in the left bottom side, you'll be able to see total route duration that includes average wait time in those stops, so it will give you a correct calculation of route from Stop A to Stop B, plus the average wait time on these stops.

17. On the Next Step for the Billing Charges you'll be able to select the customer you want to Bill to, set the Reference ID, Assign them to a group which is optional, the Contact will be automatically added based on the customer's phone book and you can set the payment term.
For the charges part, you can add multiple charges by clicking on the Add Another and select charges from the list. Set the quantity and rate which will be added. It will be added to grand total. And select the blue checkmark box.
EXAMPLE
18. Validation part shows you an overview of your shipment detail, such as Stop Name for both pickup and delivery which is the Equipment type used for this shipment, Quantity, how much it will be Loaded and Unloaded in the stops and Weight.

19. On the next step, when uploading the documents, you'll be able to proceed with optimizing the route without uploading the documents, only in case they are not required by the customer terms.
In case the customer has required to have some documents attached while creating the shipment, you won't be able to proceed on creating the shipment without uploading the required document, you'll get an error popup saying that you need to upload the required document that such as Confirmation or Bill Of Lading.
EXAMPLE

To upload such document all you have to do is to is Select the type of document from drop down menu that is required by the customer, set an Reference ID, and attach the document to this shipment.

EXAMPLE

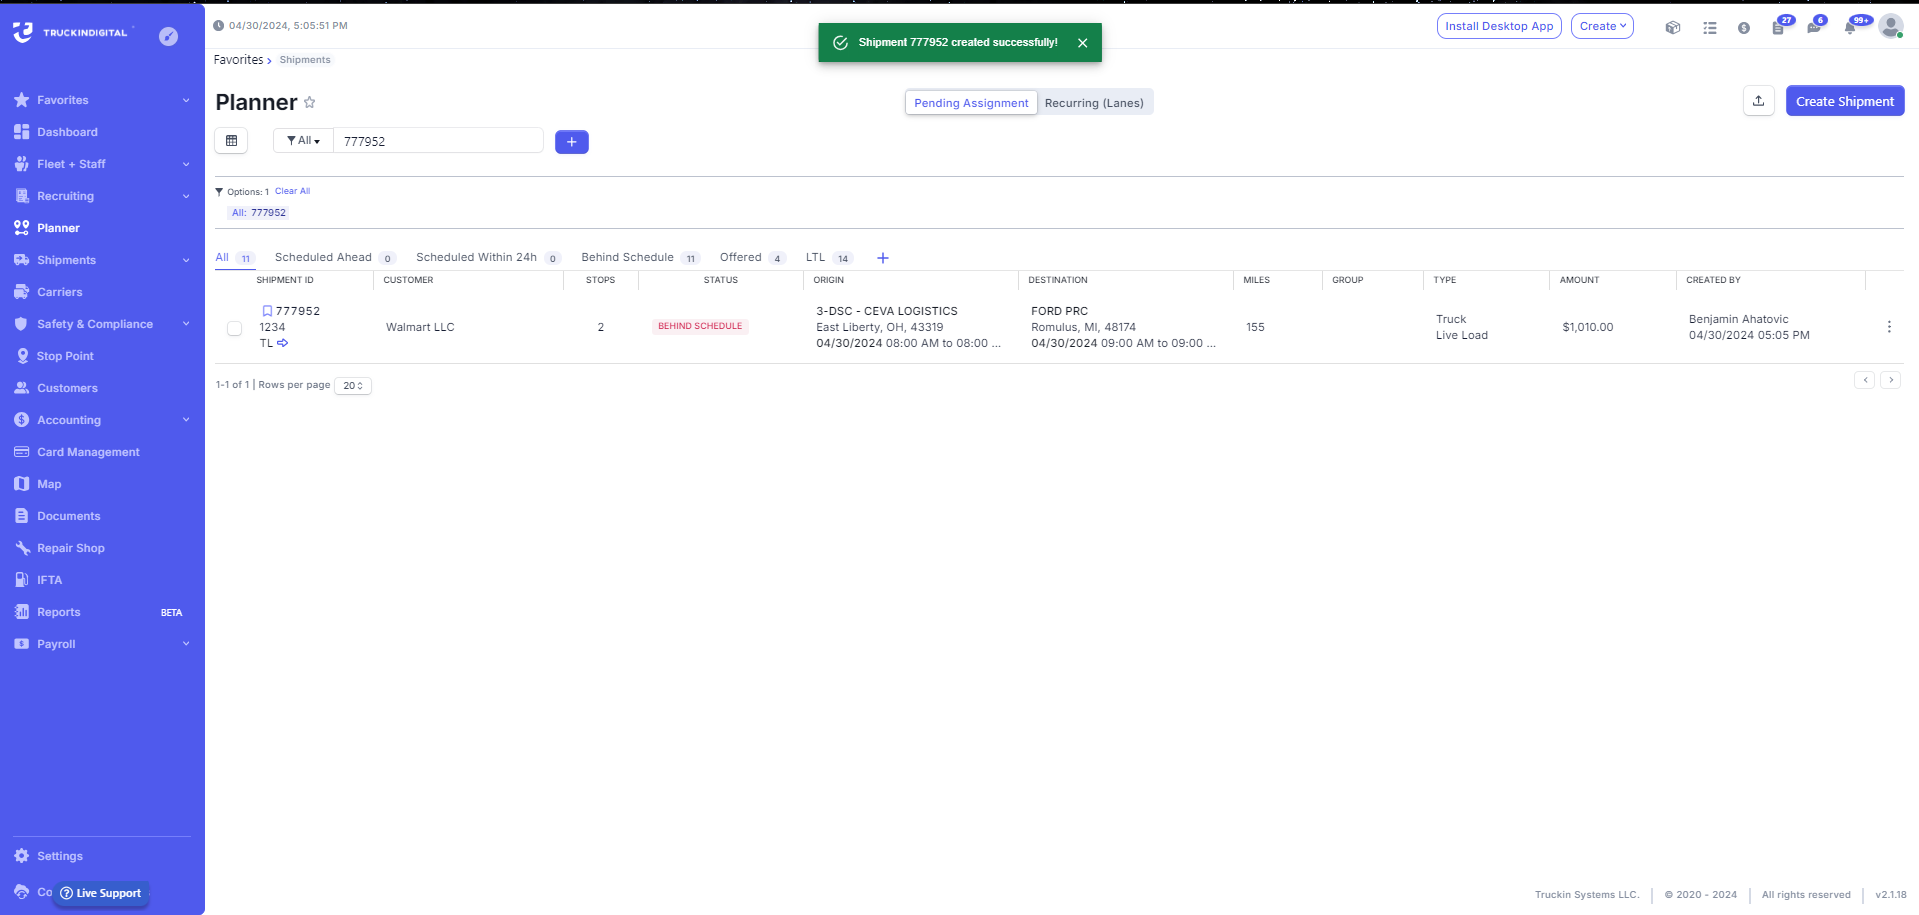
After you have uploaded the required documents you'll be able to finish creating shipment by clicking on Create Shipment button.

You have successfully created your shipment and it is now ready for dispatch!
Was this article helpful?
That’s Great!
Thank you for your feedback
Sorry! We couldn't be helpful
Thank you for your feedback
Feedback sent
We appreciate your effort and will try to fix the article